Ubuntu 搭建透明代理,科学上网

Attson Lv3

Ubuntu 搭建透明代理,科学上网

说明

本教程基于 ubuntu server 22.04, 需要配置的东西较多 (desktop 也是一样有效)

使用

  • dnsmasq
  • rc.local
  • ipset
  • shadowsocks-libev@redir
  • supervisor
  • pdnsd
  • gfwlist2dnsmasq_url

安装

安装 dnsmasq, ipset, shadowsocks-libev, supervisor

使用 apt-get 直接安装,也可以自行编译

1
apt-get update && apt-get install -y supervisor dnsmasq shadowsocks-libev ipset

安装 pdnsd

(github 无法访问的,可以使用https://ghproxy.com代理 如 https://ghproxy.com/https://github.com/SAPikachu/pdnsd.git )

使用 https://github.com/SAPikachu/pdnsd.git 编译安装 (pdnsd 原作者已经不维护了,该仓库亲测可用,但是在22.04 上需要稍稍调整)

1
2
3
4
5
6
7
git clone https://github.com/SAPikachu/pdnsd.git

cd pdnsd

./configure --prefix=/usr/local/pdnsd/

make && make install

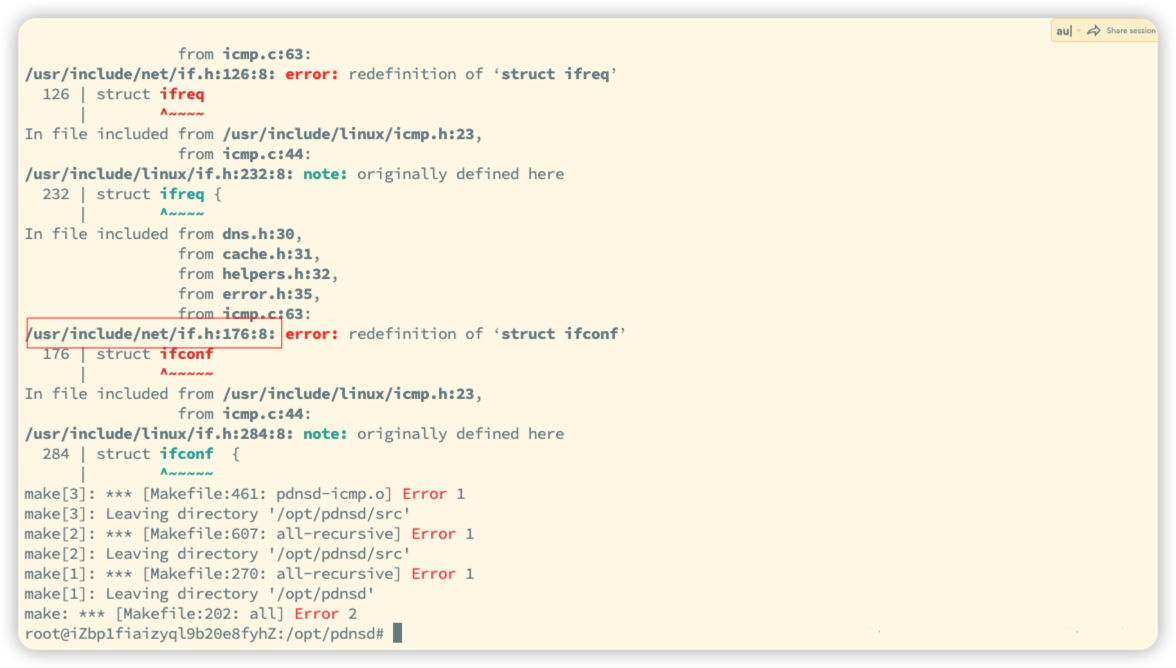
如果出现

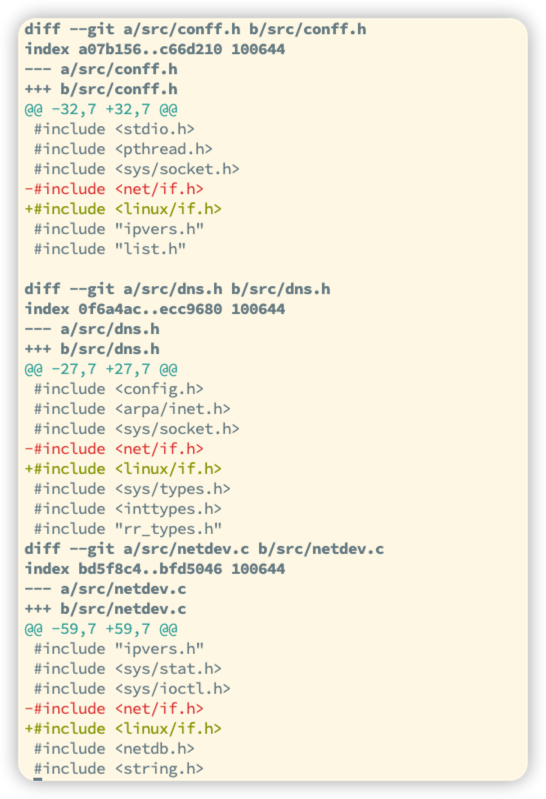
原因是 net/if.h 和 linux/if.h 重复定义,统一使用 linux/if.h 就可以了

修改冲突文件

1
2
3
sed -i 's/<net\/if.h>/<linux\/if.h>/g' src/conff.h
sed -i 's/<net\/if.h>/<linux\/if.h>/g' src/dns.h
sed -i 's/<net\/if.h>/<linux\/if.h>/g' src/netdev.c

配置

配置 shadowsocks-libev

新增文件 /etc/shadowsocks-libev/redir.json

1
2
3
4
5
6
7
8
{
"server":"xxx.xxx.xxx",
"server_port": 1000,
"local_port":8989,
"password":"server_password",
"timeout":3600,
"method":"chacha20-ietf-poly1305"
}
  • local_port 需要与 [iptable](./ubuntu-transparent-proxy.md#配置 rc.local) 转发端口一致
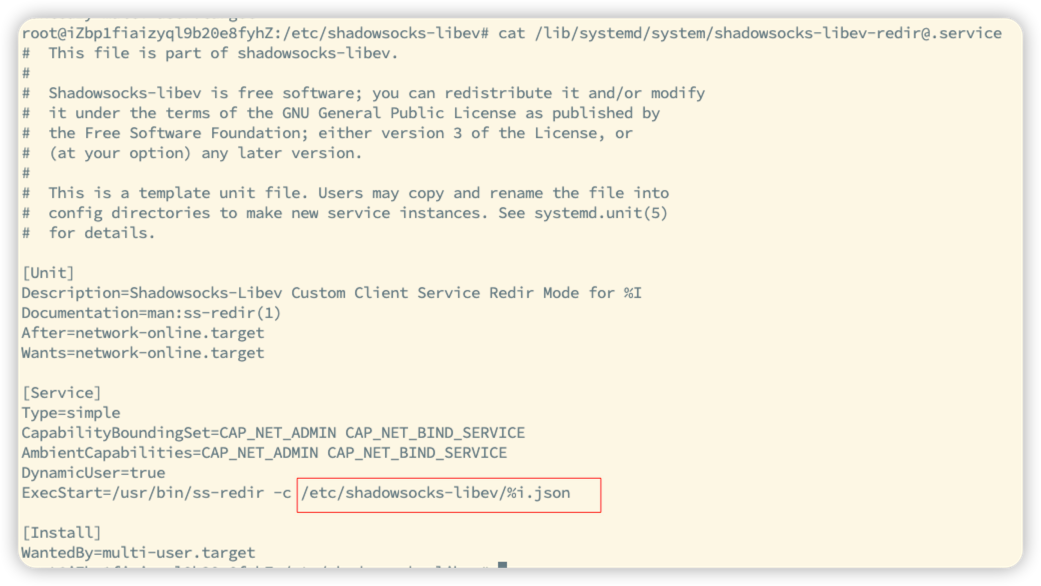
  • /etc/shadowsocks-libev/redir.json 文件名需要与 systemctl 启动的命令一致 systemctl start shadowsocks-libev-redir@redir 因为该 service 脚本读取的配置文件名是使用 %i.json

添加 service 重试次数 (重启时, 由于网络组件启动顺序问题,可能会导致ss-redir 启动失败)

1
2
3
4
5
6
7
8
9
cp /lib/systemd/system/shadowsocks-libev-redir@.service /etc/systemd/system/shadowsocks-libev-redir@.service

echo "
[Unit]
StartLimitInterval=200
StartLimitBurst=5
[Service]
Restart=always
RestartSec=30" >> /lib/systemd/system/shadowsocks-libev-redir@.service

配置pdnsd

使用 supervisor 管理 pdnsd

新增文件 /etc/supervisor/conf.d/pdnsd.conf

1
2
3
4
5
[program:pdndsd]
command=/usr/local/pdnsd/sbin/pdnsd -c /etc/pdnsd.conf
user=root
autostart=true
autorestart=true

新增文件 /etc/pdnsd.conf

1
2
3
4
5
6
7
8
9
10
11
12
13
14
15
16
17
18
19
20
21
22
23
24
25
26
27
28
29
30
31
32
33
34
35
36
37
38
39
40
41
42
43
44
45
46
47
48
49
50
51
52
53
54
55
56
57
58
59
60
61
62
63
64
65
66
67
68
69
70
71
72
73
74
75
76
77
78
79
80
81
82
83
84
85
86
87
88
89
90
91
global {
perm_cache=4096;
cache_dir="/tmp";
run_as="nobody";
server_ip = 0.0.0.0;
server_port = 5354;
query_method=tcp_only;
status_ctl = on;
tcp_server = on;
min_ttl=1h;
max_ttl=1w;
paranoid=on;
timeout=15;
randomize_recs = on;
debug = off;
daemon = off;
verbosity = 1;
}


# The servers provided by OpenDNS are fast, but they do not reply with
# NXDOMAIN for non-existant domains, instead they supply you with an
# address of one of their search engines. They also lie about the addresses of
# of the search engines of google, microsoft and yahoo.
# If you do not like this behaviour the "reject" option may be useful.

server {
label = "GoogleDns";
ip = 8.8.8.8,8.8.4.4;
proxy_only = on;
timeout = 10;
uptest = query;
query_test_name = "www.google.com";
purge_cache = off;
interval = 1m;
}

# The servers provided by OpenDNS are fast, but they do not reply with
# NXDOMAIN for non-existant domains, instead they supply you with an
# address of one of their search engines. They also lie about the addresses of
# of the search engines of google, microsoft and yahoo.
# If you do not like this behaviour the "reject" option may be useful.

server {
label = "opendns";
ip = 208.67.222.222, 208.67.220.220;
proxy_only = on;
reject = 208.69.32.0/24, # You may need to add additional address ranges
208.69.34.0/24, # here if the addresses of their search engines
208.67.219.0/24; # change.
reject_policy = fail; # If you do not provide any alternative server
# sections, like the following root-server
# example, "negate" may be more appropriate here.
timeout = 10;
uptest = query;
query_test_name = "www.google.com";
interval = 1m;
preset = off;
}

server {
label = "root-servers";
root_server = discover;
randomize_servers = on;
ip = 198.41.0.4,192.228.79.201,192.33.4.12,199.7.91.13,
192.203.230.10,192.5.5.241,192.112.36.4,128.63.2.53,192.36.148.17,
192.58.128.30,193.0.14.129,199.7.83.42,202.12.27.33;
timeout = 15;
uptest = query;
query_test_name = .;
interval = 30m;
ping_timeout = 300;
purge_cache = off;
edns_query = yes;
exclude = .localdomain;
policy = included;
preset = off;
}

rr {
name=localhost;
reverse=on;
a=127.0.0.1;
owner=localhost;
soa=localhost,root.localhost,42,86400,900,86400,86400;
}

source{
owner=localhost;
file="/etc/hosts";
}

配置 dnsmasq

配置 /etc/dnsmasq.conf

1
2
3
4
5
6
7
8
#check dnssec resource record
dnssec
#this enables dnsmasq send queries to all available dns server and the fastest answer will be used
all-servers
#disable resolv file
no-resolv
# include user conf
conf-dir=/etc/dnsmasq.d

配置 /etc/dnsmasq.d/server.conf

1
2
3
4
5
6
7
8
9
10
11
12
#Local Process
server=127.0.0.1
# your route dns
#server=192.168.1.1
#FuZhou DNS
server=218.85.157.99
server=218.85.152.99
#Google DNS
server=8.8.8.8
server=8.8.4.4
#Open DNS
server=208.67.220.220

配置 /etc/dnsmasq.d/gfw.conf

使用 gfwlist2dnsmasq_url 生成 (这里面的域名就是需要被代理的)

1
2
3
4
5
git clone https://github.com/cokebar/gfwlist2dnsmasq.git

cd gfwlist2dnsmasq
# -p 是 pdnsd 的 server_port,需要保持一致
./gfwlist2dnsmasq.sh -p 5354 -s gfw -o /etc/dnsmasq.d/gfw.conf

配置 rc.local

1
2
# 如果 /etc/rc.local 已经存在,建议先备份
cp /etc/rc.local /etc/rc.local.bak

添加 /etc/rc.local

1
2
3
4
5
6
7
8
9
10
#!/bin/sh -e

ipset create gfw iphash -exist
iptables -t nat -A OUTPUT -p tcp -d 8.8.8.8 -j REDIRECT --to-ports 8989
iptables -t nat -A OUTPUT -p tcp -d 8.8.4.4 -j REDIRECT --to-ports 8989
iptables -t nat -A OUTPUT -p tcp -d 208.67.222.222 -j REDIRECT --to-ports 8989
iptables -t nat -A OUTPUT -p tcp -d 208.67.220.220 -j REDIRECT --to-ports 8989
iptables -t nat -A OUTPUT -p tcp -m set --match-set gfw dst -j REDIRECT --to-ports 8989

exit 0
1
2
3
4
5
6
# 
chmod +x /etc/rc.local
cp /lib/systemd/system/rc-local.service /etc/systemd/system/rc-local.service
echo "
[Install]
WantedBy=multi-user.target" >> /etc/systemd/system/rc-local.service

配置 /etc/iproute2/rt_tables

1
2
3
# 在文件最后增加一行
echo "
10 gfw" >> /etc/iproute2/rt_tables

配置 /etc/resolv.conf

1
2
3
echo "nameserver 127.0.0.1" > /etc/resolv.conf
# 保护该文件,避免重启被其他程序覆盖
chattr +i /etc/resolv.conf

所有的配置工作就已经结束了

启动

1
2
3
4
5
6
7
8
9
10
11
12
13
14
15
# 重新加载service
systemctl daemon-reload

# 关闭系统dns
systemctl stop systemd-resolved
systemctl disable systemd-resolved

systemctl enable rc-local && systemctl restart rc-local
# 开启dnsmasq
systemctl enable dnsmasq && systemctl start dnsmasq
# 开启shadowsocks
systemctl enable shadowsocks-libev-redir@redir && systemctl start shadowsocks-libev-redir@redir
systemctl restart supervisor
# 运行rc.local 一次
bash /etc/rc.local

验证

1
curl www.google.com

附录

如需添加新的代理域名

1
2
3
4
5
echo "
server=/zzux.com/127.0.0.1#5354
ipset=/zzux.com/gfw" >> /etc/dnsmasq.d/gfw.conf

systemctl restart dnsmasq

如果重启之后出现无法访问代理网站

  1. 检查 ss-redir dnsmasq supervisor-pdnsd 运行状况
  2. 检查 /etc/resolv.conf 是否被篡改

如果碰到类似的界面,使用tab切换到ok就好了

参考

  • 标题: Ubuntu 搭建透明代理,科学上网
  • 作者: Attson
  • 创建于 : 2023-01-12 22:20:41
  • 更新于 : 2024-08-14 18:51:33
  • 链接: https://attson.github.io/p/ubuntu-transparent-proxy.html
  • 版权声明: 本文章采用 CC BY-NC-SA 4.0 进行许可。
 评论